GISHydroNXT System Documentation
Python Add-In Wizard Instructions
Python Add-In is a customization application to design toolbars, buttons, tools, combo boxes, menus, tool palettes, and application extensions.
In this section, you will learn:
1] How to create a project
2] How to create toolbar, tools, buttons, and provide specifications
3] Create an extension (wxPython in current case)
4] Create and install an Add-In
1] How to create a project
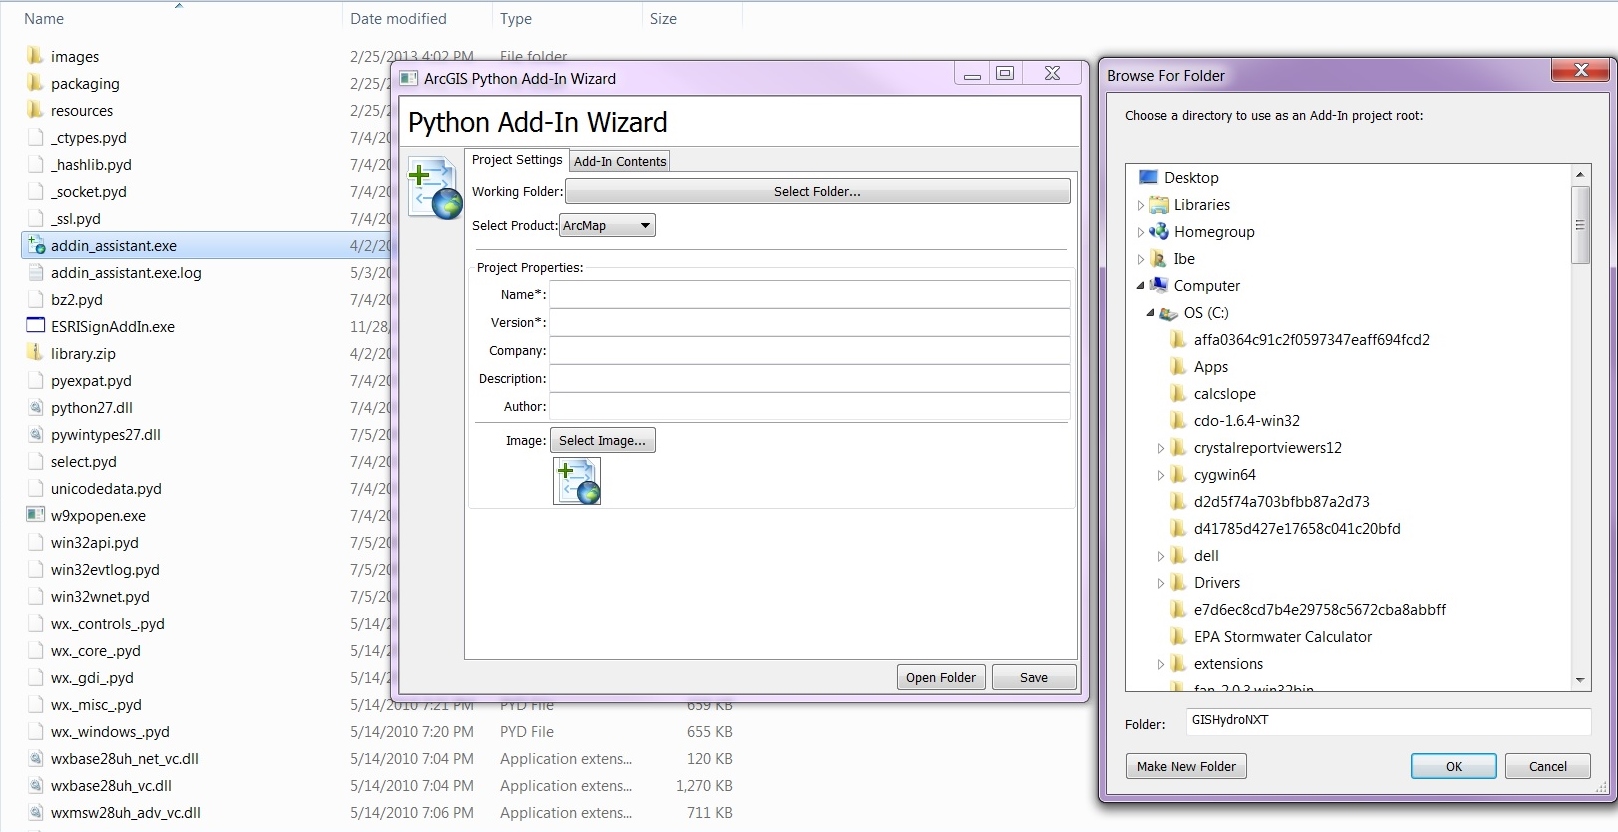
First step is to download Python Add-In Wizard, which can be found at following link. Click on the download tab on the right of page and save
ZIP file on your computer. Unzip all contents and look for file named "addin_assistant.exe". Double click this executable file to launch
Python Add-In Wizard.

2] How to create toolbar, tools, buttons, and provide specifications
A comprehensive documentation by ESRI on background and creation of Python Add-In is provided at following link.
3] Create an extension (wxPython in current case)
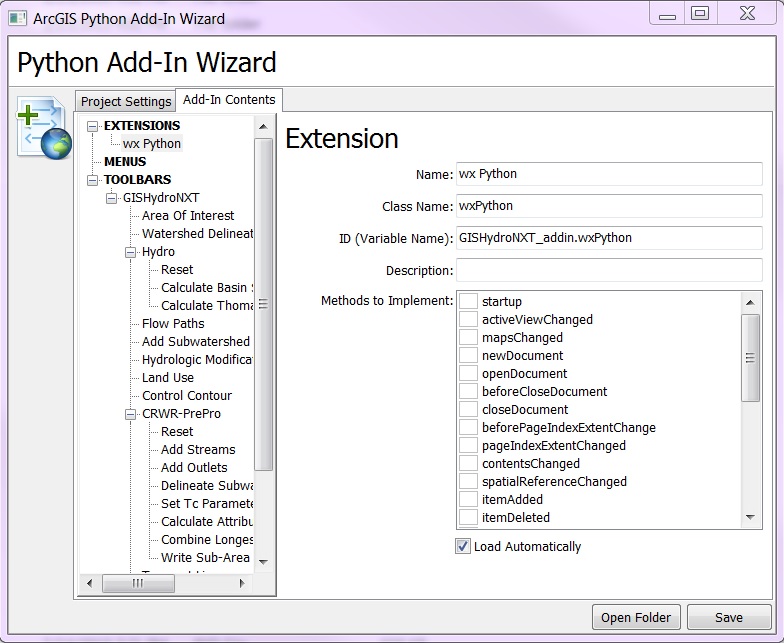
Second tab on Python Add-In Wizard is "Add-In Contents" which helps to create extension and many other functionalities as detailed in step 2 weblink.
While creating an extension, it is necessary to check "Load Automatically" option at the bottom. Rest of the options such as name, class name, and ID are
created similarly as buttons and tools. Once these options are specified, a python class has to be placed within master code at the bottom to check
out newly created extension (which is provided below). In addition to extension check out, all button names have to be initialized. These names have
to be placed somewhere in code and placed just before wxPython extension check out (in current case).
 #******************************************************************************************************
# Initialize buttons to avoid "global name definition error"
#******************************************************************************************************
button1 = ResetWatershed()
button2 = BasinStatistics()
button3 = ThomasDischarge()
button4 = ResetSubWatershed()
button5 = AddStreams()
button6 = AddOutlets()
button7 = DelineateSubwatersheds()
button8 = SetTcParameters()
button9 = CalculateAttributes()
button10 = CombineLongestFlowPathSegments()
button11 = WriteSubAreaLandUseDistribution()
button12 = PrecipitationDepths()
button13 = ControlPanel()
button14 = ExecuteTR20()
#******************************************************************************************************
#******************************************************************************************************
# wxPython extension checkout at startup.
# Provided by Mark Cederholm and modified by Ibraheem Khan for GISHydroNXT.
#******************************************************************************************************
class wxPython(object):
"""Implementation for GISHydroNXT_addin.wxPython (Extension)"""
def __init__(self):
# For performance considerations, please remove all unused methods in this class.
self.enabled = True
def startup(self):
try:
from wx import PySimpleApp
self._wxApp = PySimpleApp()
self._wxApp.MainLoop()
except:
sMsg = "Error starting extension:\n" + traceback.format_exc()
pythonaddins.MessageBox(sMsg, "TestAddIn")
#******************************************************************************************************
# Initialize buttons to avoid "global name definition error"
#******************************************************************************************************
button1 = ResetWatershed()
button2 = BasinStatistics()
button3 = ThomasDischarge()
button4 = ResetSubWatershed()
button5 = AddStreams()
button6 = AddOutlets()
button7 = DelineateSubwatersheds()
button8 = SetTcParameters()
button9 = CalculateAttributes()
button10 = CombineLongestFlowPathSegments()
button11 = WriteSubAreaLandUseDistribution()
button12 = PrecipitationDepths()
button13 = ControlPanel()
button14 = ExecuteTR20()
#******************************************************************************************************
#******************************************************************************************************
# wxPython extension checkout at startup.
# Provided by Mark Cederholm and modified by Ibraheem Khan for GISHydroNXT.
#******************************************************************************************************
class wxPython(object):
"""Implementation for GISHydroNXT_addin.wxPython (Extension)"""
def __init__(self):
# For performance considerations, please remove all unused methods in this class.
self.enabled = True
def startup(self):
try:
from wx import PySimpleApp
self._wxApp = PySimpleApp()
self._wxApp.MainLoop()
except:
sMsg = "Error starting extension:\n" + traceback.format_exc()
pythonaddins.MessageBox(sMsg, "TestAddIn")
4] Create and install an Add-In
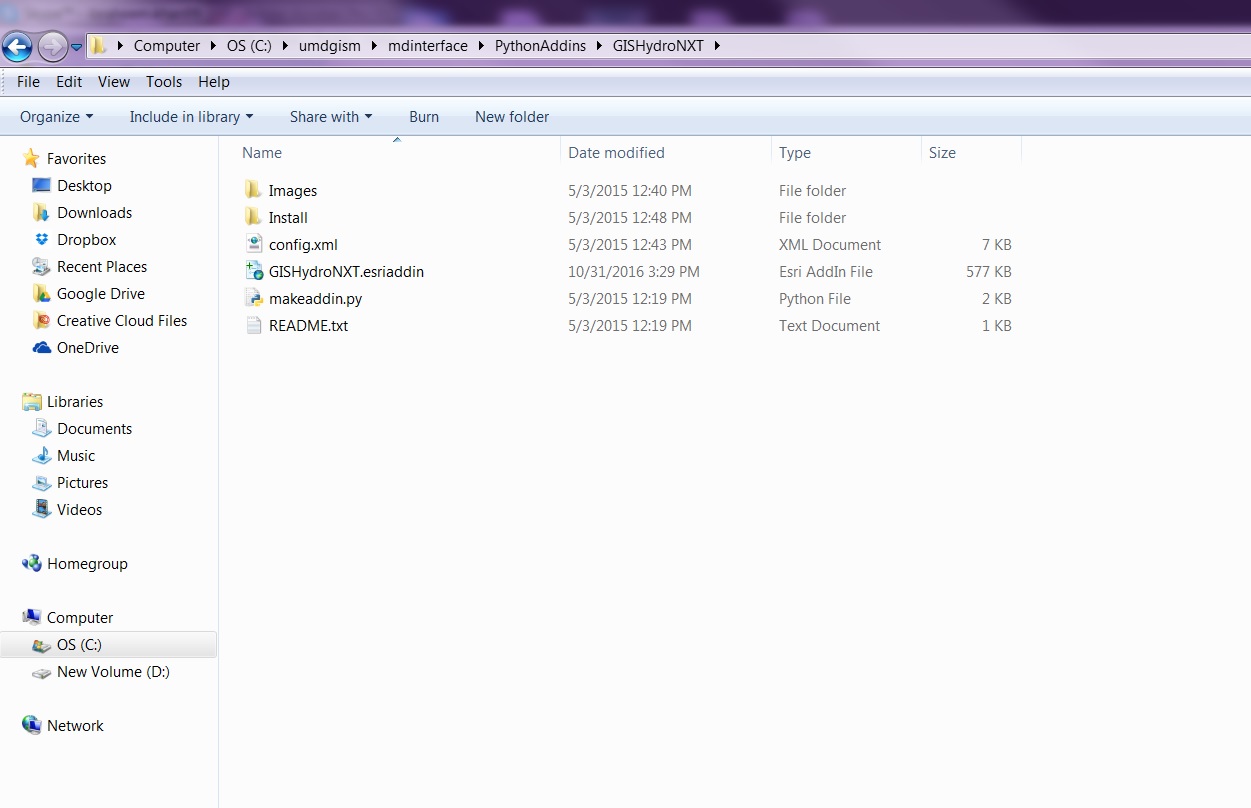
When a project folder is created and its path is specified as outlined in step 1 above, it will create two folders (Images and Install), an xml
file, makeaddin.py file (to create add-in), and a readme file. Code resides in Install folder, and all images for tools reside in Images folder.
Once finish coding, double-click makeaddin.py file and it will create *.esriaddin file (an example shown in image below). To install Add-In, double
click this newly created file and click "Install Add-In" and then OK to finish Add-In installation.


 #******************************************************************************************************
# Initialize buttons to avoid "global name definition error"
#******************************************************************************************************
button1 = ResetWatershed()
button2 = BasinStatistics()
button3 = ThomasDischarge()
button4 = ResetSubWatershed()
button5 = AddStreams()
button6 = AddOutlets()
button7 = DelineateSubwatersheds()
button8 = SetTcParameters()
button9 = CalculateAttributes()
button10 = CombineLongestFlowPathSegments()
button11 = WriteSubAreaLandUseDistribution()
button12 = PrecipitationDepths()
button13 = ControlPanel()
button14 = ExecuteTR20()
#******************************************************************************************************
#******************************************************************************************************
# wxPython extension checkout at startup.
# Provided by Mark Cederholm and modified by Ibraheem Khan for GISHydroNXT.
#******************************************************************************************************
class wxPython(object):
"""Implementation for GISHydroNXT_addin.wxPython (Extension)"""
def __init__(self):
# For performance considerations, please remove all unused methods in this class.
self.enabled = True
def startup(self):
try:
from wx import PySimpleApp
self._wxApp = PySimpleApp()
self._wxApp.MainLoop()
except:
sMsg = "Error starting extension:\n" + traceback.format_exc()
pythonaddins.MessageBox(sMsg, "TestAddIn")
#******************************************************************************************************
# Initialize buttons to avoid "global name definition error"
#******************************************************************************************************
button1 = ResetWatershed()
button2 = BasinStatistics()
button3 = ThomasDischarge()
button4 = ResetSubWatershed()
button5 = AddStreams()
button6 = AddOutlets()
button7 = DelineateSubwatersheds()
button8 = SetTcParameters()
button9 = CalculateAttributes()
button10 = CombineLongestFlowPathSegments()
button11 = WriteSubAreaLandUseDistribution()
button12 = PrecipitationDepths()
button13 = ControlPanel()
button14 = ExecuteTR20()
#******************************************************************************************************
#******************************************************************************************************
# wxPython extension checkout at startup.
# Provided by Mark Cederholm and modified by Ibraheem Khan for GISHydroNXT.
#******************************************************************************************************
class wxPython(object):
"""Implementation for GISHydroNXT_addin.wxPython (Extension)"""
def __init__(self):
# For performance considerations, please remove all unused methods in this class.
self.enabled = True
def startup(self):
try:
from wx import PySimpleApp
self._wxApp = PySimpleApp()
self._wxApp.MainLoop()
except:
sMsg = "Error starting extension:\n" + traceback.format_exc()
pythonaddins.MessageBox(sMsg, "TestAddIn")
